Monday, August 27, 2012

How to Filter Emails in Outlook

Microsoft Outlook allows you to filter your emails, so you can see the ones within certain criteria. The filter feature is a part of Outlook's spam filters. The feature is available for each version of Outlook provided by Microsoft. Follow the given steps to use a filter in outlook.

If you want to recover deleted emails in outlook ,then follow this article-How to Recover Deleted Emails in Microsoft Outlook 2010
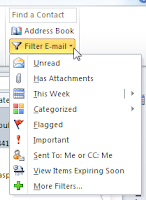
How to Filter Emails in OutlookStep1: To filter emails in Outlook, go to the Home tab then Find group and click Filter Email. From the options, you can select any of the filters to see your emails. For example, select This Week to show time ranges and then click Last Week to check the emails received last week.  

Step2: To remove the filter, click ‘Close Search’, and your email view will return to normal view.

Step3: If you want to filter One Sender's Mail to a Certain Folder Automatically in Outlook then follow the given points.
  • Open an email from the sender whose messages you want to filter. 
  • Go to the Home tab in the ribbon. 
    turn off automatic filtering from junk folder
  • Select Rules ->Always Move Messages From: "Sender" under Move
  • Highlight the desired target folder. 
  • Click OK.

Step4: You can also turn off automatic filtering from Junk folder. To disable automatic filtering, go to the "Home" tab ->Junk->Junk Email Options-> select "No Automatic Filtering".

See also: How to Recover Microsoft Outlook After a Crash
              How to Manually Back Up your Emails in Microsoft Outlook 2007

Friday, August 3, 2012

How to Set Up an Outlook Web Access Account(OWA)

Outlook Web Access (OWA) is a web e-mail service used along with the Microsoft Exchange Hosting server. With this feature, you can get your information via the Internet. The advantage to using OWA is the ability to read your email messages from any computer(see:). You can publish information via Web access, create storage files and handle your schedule. Follow the given steps to setup Outlook web access account.

To create and manage contact group in Outlook 2010,follow this blog-How to Create and Manage Contact Groups in Microsoft Outlook 2010

Step1:  Close Microsoft Outlook in your system.

How to SetUp an Outlook Web Access Account
Step2: From Start button, select "Control Panel"->"User Accounts"-> choose “Mail" from the available options.

Step3: Select "Show Profiles" from the Mail Setup dialog box then simply choose the "Add" option.

Step4: Type in a name for the user profile in the "Name" written text box and click the "Ok" button. It will open the Auto Account Setup system.

Step5: Type your email address and name in the "Auto Account Setup" dialog box. It should be similar with your computer log-on and Window Live sign-in information. Click the "Next" button to continue.

Step6:  When request permission message prompted then click the "Allow" button

Step7: After completing all the steps, press the “Finish" button.

See also: How to Use Microsoft Outlook to Start a Mailing List
               How to setup Hotmail account in Outlook 2010

Friday, July 27, 2012

How to Fix "Cannot Open Attachments in Outlook"

How to Fix
Microsoft Outlook stores your email messages and allows you to download files stored in your messages (also known as attachments) to your computer. Sometimes, Outlook blocks certain file formats from download, because they can be virus that can harm our computer. This problem can occur due to virus problem or the temp folder of your outlook that saves copies of your attachments has become full.  Follow the given steps to fix Microsoft Outlook problems.

If you want to unlock attachment restriction in Outlook,then follow this article-How to Unlock Attachment Restriction in Microsoft Outlook

Step1: To clean out the folder in outlook, click “Start” button ->Run-> Type "REGEDIT.EXE" and click "OK”.

Step2: It will open Registry Editor Window. Go to "Edit" on the toolbar and click "Find".

Step3:  Type "OutlookSecureTempFolder" in the "Find What" box and hit Enter.

Step4: Find this path, C:\Users\rac\AppData\Local\Microsoft\Windows\Temporary Internet Files\Content.Outlook\CU8KPJWH\

Step5: Copy location of that folder. Then again click Start button and in Run box paste the folder location. Click “OK”.

Step6:  It will open up Windows Explorer. Delete all the temporary Internet files from this folder.   

Step7: Scan the file with a virus scanning program before opening the attachment if the file is from someone you don't know. You can also download and install CodeTwo Attach Unblocker to open attached file in Outlook.

See also: How to Fix Synchronization Problems in Microsoft Outlook
               How to delete error message from Outlook

Thursday, July 26, 2012

How to Fix Microsoft Outlook Error 0×80042108

How to Fix Microsoft Outlook Error 0×80042108
Microsoft outlook is very powerful and reliable email client application. It provides very safe and secure platform for private or official mails. Despite that it may face errors. Error 0x80042108  is  one amongst serious Microsoft Outlook problems that leads to data loss in Microsoft Outlook application.

When you are trying to send or receive mails, you may receive error message like- Sending and Receiving' reported error (0x80042108): 'Outlook is unable to connect to your outgoing (SMTP) e-mail server'.

There could be number of reasons behind this error message such as:
  • Enabled SSL on your computer
  • Corrupted or damaged Outlook PST file
  • Enabled anti-spam add-in
  • Due to ant-virus software programs
  • Corruption in registry file

1. If this Outlook error is caused due to antivirus programs then check the setting and disable the email scanning process during sending or receiving mails.

2. Remove damaged email message and repair the Microsoft outlook PST file using Scanpst.exe (see:How to Use Inbox Repair Tool for Microsoft Outlook 2007). To run Scanpst.exe, follow the given steps.
      Step1: If Outlook is open, then close it.

      Step2: From the 'Start' menu, choose 'Search' option. Type 'Scanpst.exe' in Search box and hit the Enter key or Search button.

      Step3: Double click the 'Scanpst.exe' file.

      Step4: Locate the corrupt file and start repairing.

      Step5: Once the file is repaired, you can see the message "Repair Complete." you can now Open Microsoft Outlook.

      3. Try to clean the windows registry but registry modification is a sensitive procedure. Download Ccleaner, a free registry tool and run it on your computer. You should close Outlook while you run the tool in your system.

      See also: How to Fix Microsoft Outlook Error 0x80042109
                     How to Setup POP or IMAP Email Account in Microsoft Outlook

      Monday, July 23, 2012

      How to Add a Signature in Outlook 2007

      Add your contact information as a Signature to your emails is more professional look and very useful in corporate environment. In Microsoft Outlook 2007, user can create more than one signature with picture or logo. Follow the given steps to create signature in Outlook 2007.

      If you want to create signature in Microsoft Outlook 2010 ,then follow this article-How to create a Signature in Outlook 2010

      Step1: Open Microsoft Outlook 2007.

      Step2: click on “New “to compose a new message, then click on the Insert tab on the Ribbon and choose Signature.

      How to Add a Signature in Outlook 2007Step3: A new window should open to the E-mail Signature tab. Click the "New" button and type your signature. Click "OK."

      Step4: Now use the Edit signature box to compose your signature. You can change the colors, fonts, etc.

      Step5: From “Choose default signature” section, you can choose a signature for different email accounts, if you have more than one account.

      Step6: After completing the all above steps click “OK” to proceed.

      Step7: Now compose message and choose signature which you want. The selected signature will now appear.

      See also: How to Set up Auto-Reply to Emails
                     How to reset Microsoft Outlook to factory setting

      Friday, July 20, 2012

      How to Repair OST files in Microsoft Outlook

      How to Repair OST files in Microsoft Outlook
      An OST (Offline Storage Table) file store the offline work and then synchronize changes with the exchange server when Microsoft Outlook turns online. It is possible for OST files to become corrupted, that time user unable to access those files. Using integrated tool feature user can repair OST file in Microsoft Outlook. Follow the given steps to repair OST files in Microsoft Outlook.

       If you want to import OST file in Microsoft Outlook then follow this article-How to Import OST File to Microsoft Outlook

      Step1: If your Outlook is open then close it.

      Step2: From "Start" menu, and go to the search box and type "scanost.exe".

      Step3: Now OST Integrity Check Tool will open .Hit Enter to open scanost tool.

      Step4: Click "Scan all folders". It may take few minutes for the scan to finish. Select "Choose folder to scan", which folder you want to scan. You can check the box preceding the line “Repair errors" to have the tool automatically resolve issues.

      Step5: Select "Begin scan". The OST Integrity Tool Box will scan and fix any errors with the OST file(s).

      Step6: Now you can open Microsoft Outlook.

      See also: How to restore .pst/.ost in Outlook
                     How to repair PST files using Inbox Repair Tool  

      Monday, July 16, 2012

      How to Fix Synchronization Problems in Microsoft Outlook

      Microsoft Outlook users may prefer to sync Outlook to enable online/offline work. Outlook users may receive a variety of error messages related to server limitations, corrupted data etc. If synchronization is not working correctly, between the server folder and the offline folder, you must verify the profile settings. Follow the given steps to fix synchronization problems in Microsoft Outlook.
      How to Fix Synchronization Problems in Microsoft Outlook

      If you want to delete the outlook error message ,then follow this blog-How to delete error message from Outlook

      Step1: Open Microsoft outlook 2007.

      Step2: From “Tools “menu, click Account Settings.

      Step3: Click the Data Files tab, and then check that Mailbox - account name is set as the default or not.

      Step4: Click the E-mail tab and click Mailbox - account name, and then click Settings.

      Step5: Click the Advanced tab, verify that the Use Cached Exchange Mode option is selected, and then click OK.

      Step6: Click Close to close the Account Settings dialog box.

      Step7: Exit Outlook, and then reopen Outlook.

      After completing the above steps, then synchronize the folders again. To synchronize folder in Microsoft Outlook 2007, follow this blog- How to Synchronize Folders in Microsoft Outlook 2007.

      See also: How to Recover Microsoft Outlook After a Crash
                     Why Outlook 2010 shuts down unexpectedly